Want to host your site for pennies per month?
Here you are, once again. You just got pulled in to a new volunteer organization, and they don’t have a website. Since you’re a web guy, of course you can help solve the problem for them. They don’t have much of a budget, so they ask if there’s any way you could just cover it. Well, godaddy or bluehost are cheap, right? Well, sure… if you pay for a couple of years at a time, you only have to pay a few dollars per month. There’s a better way though, you may have heard that Amazon added hosting capabilities to their S3 service a while back. It turns out that with a bit of fiddling, and configuration, you can host a (static) website for pennies per month.
First things first, let’s talk about pros and cons. Cons first:
- Only static sites can be hosted on S3. This means you can’t have php or rails or anything. In today’s API prolific wold, this isn’t that big of a deal, but it is something to keep in mind.
- You can’t easily set up SSL. Amazon say they will address this, but as of this writing, there aren’t any generally good solutions.
- You may have to do some fiddling to get your DNS set up correctly. We’ll outline the most straightforward approach, however if you get off the beaten path, be prepared for a bit of a challenge.
Now for the pros
- You can host a website for pennies per month. S3 is priced based on two factors. The amount of storage you use, the amount of bandwidth you use. Since this is a website, the amount of storage will likely be pretty small (unless you are hosting a lot of video). Unless your site is carzy popular, the amount of bandwidth will be minuscule as well. In our experience, a 4 page site that gets 5-50 visitors per day costs between $0.05 and $0.25 per month.
- You can host a website for pennies per month. See above for description.
- Read the above one more time.
Now it is time to get down to brass tacks. How do you set up a website on Amazon S3?
Step 1: Create an account with Amazon Web Services.
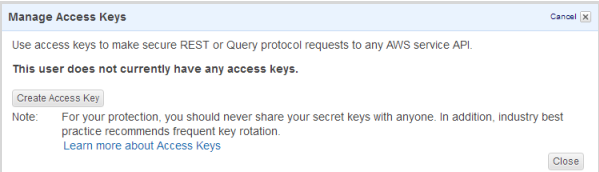
The link to sign up is right there at the top of the page. This process is even more streamlined if you have an Amazon.com account. Once your account is created, go to the Amazon Web Services console and click your username in the upper right corner. On the drop-down list you should find a “Security Credentials” link. Navigate to the ‘Users’ screen using the link on the left and select your user name from the list. Select the ‘Security Credentials’ tab for your user name and click the ‘Manage Access Keys’ button.

This should open a dialog window where you can create a new access key.
After clicking ‘Create Access Key’ you should be presented with another dialog where you can download your credentials.
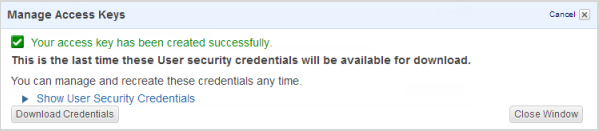
Download and save your credentials as you will not have access to the secret access key again after you close this dialog box.
Step 2. Ensure site address and bucket names are available.
In order to map a domain name to an Amazon S3 bucket, the bucket name must be the same as the domain name so that Amazon S3 can properly resolve the host headers sent by web browsers. Additionally, Amazon S3 requires that bucket names be unique across of all AWS, and so to associate the domain example.com with a website hosted on Amazon S3, you must be able to create a bucket named “example.com”. If another AWS user has already created a bucket named “example.com”, you won’t be able to associate the domainexample.com with your website hosted on Amazon S3.
Step 3. Create a bucket for your site.
You will need to create a bucket for your site. Name your bucket with the same name that you use for your site (i.e. example.com). You will need to also make a bucket with the www subdomain for the same site (i.e. www.example.com) and one bucket for log files (i.e. log.example.com). Once your bucket is created you can upload your files from the bucket management pages. Alternatively, for those who are comfortable using a command line application, there is a tool available to streamline your upload process.
Make 3 buckets for your site: one with just the domain name (example.com), one with the www subdomain (www.example.com), and one with the log subdomain to store your sites log files (log.example.com). All of these buckets will need to be in the same AWS region.
If you’re going to upload straight through the s3 website, skip down to step number 6.
Step 4. Obtain s3cmd to allow for quickly uploading your files to Amazon s3 service.
S3md is an excellent command line tool for accessing your Amazon s3 account on Linux/Mac. Once configured to your Amazon s3 account it will enable you to create/destroy buckets, upload/download files, and perform rsync functions right from your command line.
S3cmd can be installed on a Mac very quickly if you have Homebrew installed through the command: brew install s3cmd
If you need to install s3cmd under linux they have instructions on how to add the s3tools repository to your distribution and install s3cmd here.
The first thing you need to do once s3cmd is installed is to link it to your Amazon s3 account. Remember those credentials we downloaded earlier? We will need those now.
Run the command s3cmd --configure
You will be prompted for your access key and your secret key. Open up the CSV file you downloaded with your credentials and copy your access key and secret key over when prompted.
Next it will ask you for your encryption password, which will be your Amazon Web Services password. After entering your password you will be prompted to set up GPG and/or HTTPS encryption. I recommend at least enabling HTTPS encryption to protect your files while they’re in transit to s3.
Lastly you will be prompted to test your connection to Amazon’s services, say yes to this command and it will verify that all the information you put in is correct. If s3cmd experiences an error at this step it will give you the option to discard your configuration changes and start over. Provided all went well, you should be able to run the command s3cmd ls and be able to see the bucket we made before.
From this point s3cmd has 3 commands we’re really concerned with; put, get, and sync. Put and get result in an unconditional transfer and all matching files are uploaded or downloaded from s3. Sync on the other hand is a conditional transfer in which files that don’t exist at the destination in the same version are transferred. By default the files are checked with an md5 checksum and the file size is checked.
Step 5. upload your site’s content.
Now that we’ve got s3cmd set up and our bucket ready to go, we can begin uploading our content to s3. Navigate your console to the folder containing your index page, error page and static assets, then run this command except replace ‘example.com’ with your primary buckets name: s3cmd sync -P ./ s3://example.com
This command will sync all of the files in your site folder with s3, and set them all to public read only.
We will only be putting files into the root domain’s bucket. The subdomain will be configured to redirect to the root domain later and the log bucket will just be storage for your log files.
Step 6. Configure buckets.
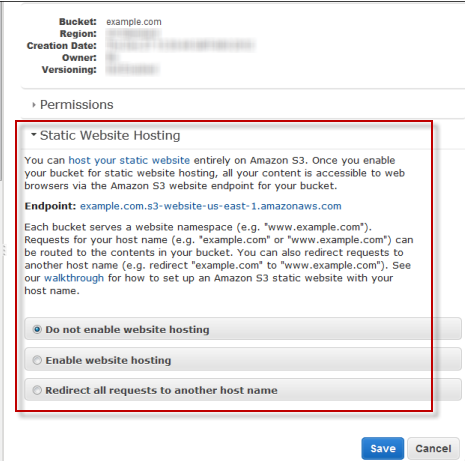
Log into your Amazon Web Service console and navigate to the s3 section. Right click your root domain bucket’s name and select the properties option. Click the Static Website Hosting drop down and you will be presented with three options regarding website hosting.
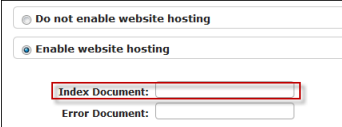
Select “Enable Website Hosting” and ensure that the Index Document option has the same name as the html document you would like for your home page. Likewise also ensure that the Error Document reflects the name of you error html page you uploaded.
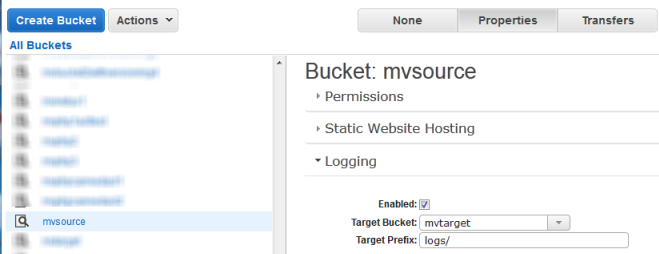
Next, go to the logging menu, and enable logging. With the drop down list select your log subdomain as your target bucket. Change the target prefix to “root/”, this will cause the logged data to be stored in a folder named root in the log bucket.
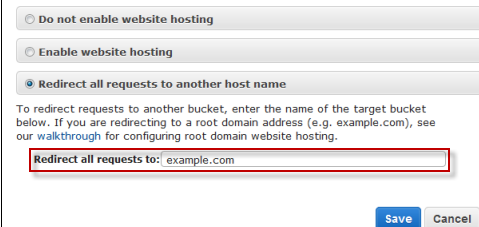
Next right click your www subdomain bucket and select properties from the drop down list. Under Static Web Hosting click “Redirect all requests to another host name”. In the prompt enter your root domain address (i.e. example.com). Now any requests for the www subdomain will be redirected to your root domain address.
Step 7. Configure your domain information with AWS.
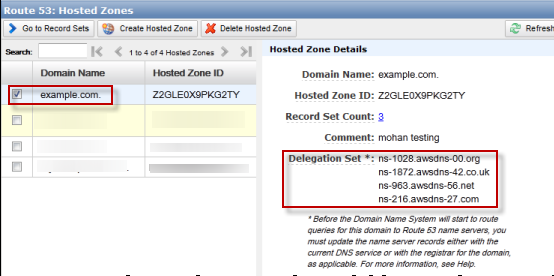
We will now configure Amazon Route 53 as your Domain Name System (DNS) provider. Go to the Amazon Route 53 console and create a hosted zone for your domain. You will be prompted for a domain name, use your root domain address. Once the new hosted zone is set up, view the details for it. You should be provided with some name server addresses under “Delegation Set”, write these down/save them. We will need them in a little while.
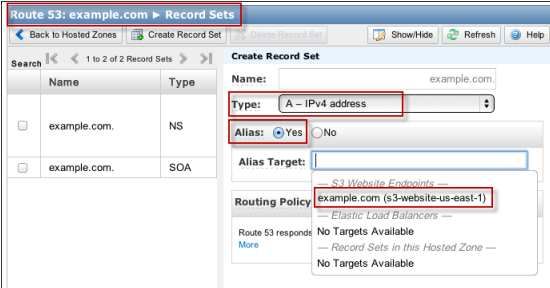
While your hosted zone is still selected, click the “go to Record Sets” link and create a record set. Do not change it’s name, it’s type will be IPv4 and set ‘alias’ to yes. The alias target will be your root domain, if you click the field you will be provided with a drop down where you can select your root domain.
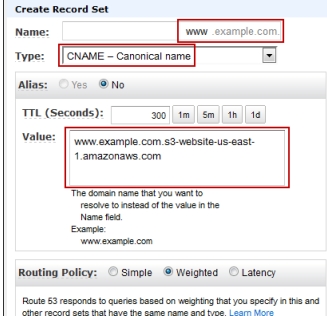
Create another record set. We will add www for our www subdomain into the name and change the type to CNAME. Leave Alias set to ‘no’ and save your new CNAME entry.
Now we will need the 4 addresses provided to us by Amazon from the Delegation Set that we copied down earlier. Return to your registrar that you used to secure your domain and replace the name servers in the registrar’s name server records with the four name servers that we copied down earlier. Save your changes with your registrar. It can take 48 hours or more for the changes to take effect.
That’s it. Once all the DNS servers are updated (2-48 hours on most ISPs), you should have a shiny new site up and running. Grab a celebratory cookie, and enjoy a job well done.